INTRODUCING DIGITAL COMICS CREATION TOOLS: STORYBOARD THAT and MAKE BELIEFS COMIX
Duration: 40 minutes Objectives: The objective of this lesson is to introduce additional digital comic ‘generators’, specifically designed for comic creation. Desirable outcomes and competences: By the end of the lesson, learners will:
|
In lesson 15 of this eLearning course, we have seen Pixton as a tool for creating comics, especially for education, and also Canva as a design tool that could be also used for digital comic creation. Those two tools are found to be easy and useful to use for educational purposes in the creation of comic strips, but there are several other ‘comic strips generators’ that could be used as well.
For this lesson (19) we will specifically focus on a selection of additional digital comic strip generators:
- StoryboardThat (https://www.storyboardthat.com/)
- Make Beliefs Comix (https://www.makebeliefscomix.com/)
StoryboardThat
General information and characteristics
StoryboardThat is a platform specifically designed for creating storyboards (3 or 6 panels strip) and offers an improved visual presentation of texts (ex. through infographics, worksheets etc.). The website is rather recent (2012), developed by a US based company, and is mainly used for educational purposes. Also, it maintains an active Facebook page and other social media channels, where the company publishes ideas for using the app in school.
The website does not offer that many guidelines for new users, but one can easily navigate through the pages and start with the comic strip/storyboard creation.
There is a free plan, which is very basic and other monthly plans targeted at different usages. Specifically, the basic “light usage” free plan requires registration with email account. There are packages for personal use (fun), education (teachers) and business (work), starting from $8.99 -$ 14.99. All the plans come with a free 14-day trial. However, the Free plan is very basic and limited (only two storyboards per week). Also, the plan for teachers is compliant with GDPR.
Overall, it is a useful and easy tool to use to create comic strips, with many available option items that users can customize. In addition, there is one text font specifically for Dyslexic people (OpenDyslexic) which makes the tool more user friendly and inclusive.
What it allows one to do
The platform offers a selection of categories in all respects, from the scenes to the characters, infographics, emojis, shapes, textables and specific examples of worksheets. There are at least 200 scenes/ backgrounds and characters adaptive to all historical periods, including mythological creatures, animals and stickers.
A great feature of the tool is the ability to dress the characters in clothes from different centuries – that could be very useful for certain subjects. Also, the tool offers customization of all colours of all items (ex. even the belt and the shoes colour of a character can be modified). Furthermore, there is a fair amount of options on limb stance (inclination of a character’s head, adjustable arm and leg posture and a few preset poses ex. sad, walking), facial expression and overall appearance, which helps to create the illusion of movement. Nonetheless, some items such as character look and backgrounds, seem a bit outdated.
Items can be moved (90 degrees rotation at a time) and there is a function to expand the item to the size of the cell/panel. The items can be added from the selection panel through a drag-and-drop option, fully supported by clear guidelines and in combination with the above mentioned (also duly supported) customization options. Very useful is the ‘undo’ and ‘redo’ button, as well as the ability to copy and move around items and cells. While copying a cell, there is the option to add the items to the second cell or replace them entirely. The layout of a cell is adjustable to add a title and description.
Users can upload photographs from another application the same team has (Photos for Class), which makes sure that the photos are appropriate. However, they cannot upload their own images or other graphic elements with the free version.
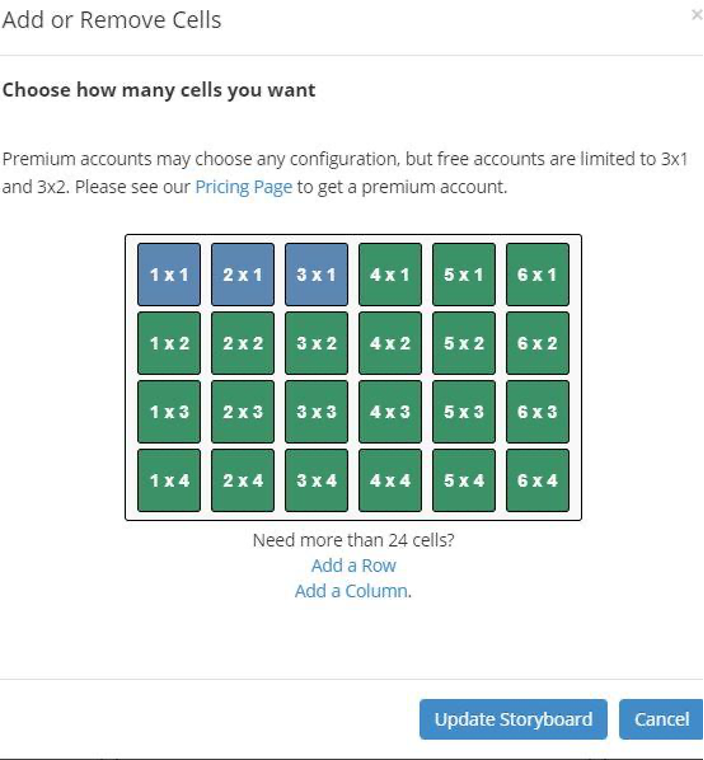
The website allows only for 3 or 6 panels to be created. Once a comic strip/storyboard is done, users can download it in PDF or image. However, there is a watermark on the free version which could be a restriction.
Brief step by step guide to start:
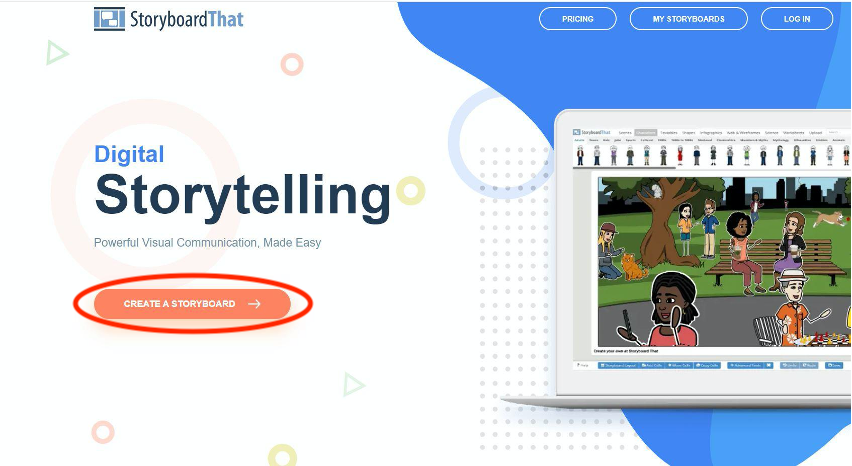
- Access the platform by clicking this link: https://www.storyboardthat.com/ and click on the “Create a storyboard” button to start your creation, or to the “log in” on the top right of the page to create an account.
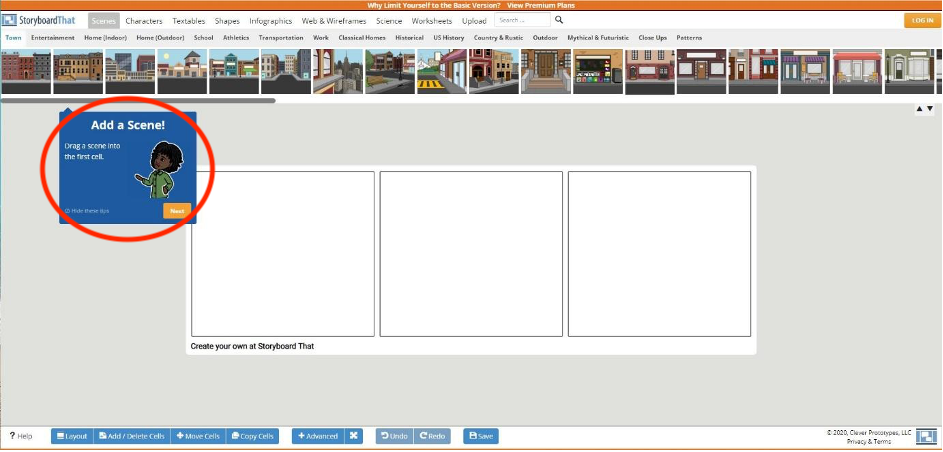
- Once you arrive in the comic/storyboard creation page, in the top line bar, you can find everything that you can add to your comic, such as: Characters, objects and scenes, thought balloons, and panel prompts. Also, there are support speech boxes as shown in the image below that can guide you to the process.
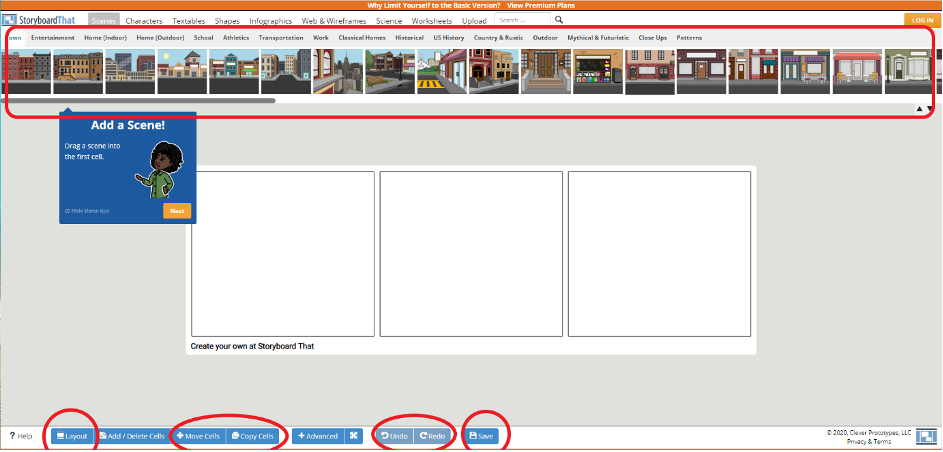
- On the bottom of the page, there are other functions regarding the panels (called cells) such as add, delete, move or duplicate, and also the “undo” and “redo” buttons.
- An example of managing the number of panels in the image below (click “add more cells”):
- Once you are satisfied with your comic, locate the “Print/Email” button to the left of the screen and click it in order to save your work via email or paper document.
Make Beliefs Comix
General information and characteristics
MakeBeliefsComix is a platform created by Bill Zimmerman which is specifically designed for creation of digital comic strips. The website was created in 2006 and is available in 13 languages. It targets many users such as teachers, parents and children, including those with special needs and English language learners. It is active on social media and users can refer there or by email for support, since there is no other customer assistance service.
The subscription is free but requires to be registered with an email address to save up to 18 panels. When users are registered, they can save their creations online or to print them (by sending them in their mailbox).
The platform also has additional resources and lesson plans, specifically for English language learning. Apart from the creation of comics, the platform also has additional resources and lesson plans, and allows creation of printables, greeting cards and creative writing. As such, it is recommended by the American Library Association and their program “Great websites for kids”, as well as by the Parents’ choice foundation. Finally, there is a page on the website with details regarding private policy and explanations about how users’ information is gathered and disseminated.
Overall, it is a somewhat easy to use, free of charge tool, yet some basic functionalities are not implemented like for instance, the possibility to personalize the characters and select another text font.
What it allows one to do
Make Beliefs Comix is a comic creator that allows users to create and print simple comics with a classic look. It is useful but not so resourceful.
It offers several characters, blank talk and thought balloons but it is limited in the options of colours for the backgrounds, or variety of characters and symbols. Specifically, Users can choose from 25 characters to fill a two-, three-, or four-panelled comic strip. Also, characters are not really customizable: users can choose the pose of the characters, but their options are limited and gender or skin colours for instance are pre-defined. There is also a limitation in the scaling of objects, which leads to some backgrounds becoming bigger than a bubble.
The quality of the elements (e.g. images) is good, but it doesn’t offer possibilities to upload external content and personal resources (e.g. to insert an image or photo from your desktop).
Users can download their strip once finished by sending an email. However, the name of the comic and its author cannot be changed on a previously saved comic. Also, if one saves the comic strip as an image, it leaves a watermarked note “This comic was created at www.MakeBeliefsComix.com. Go there and make one now!”.
Brief step by step guide to start:
- Access the platform (Make Beliefs Comix website) by clicking this link: https://www.makebeliefscomix.com/Comix/
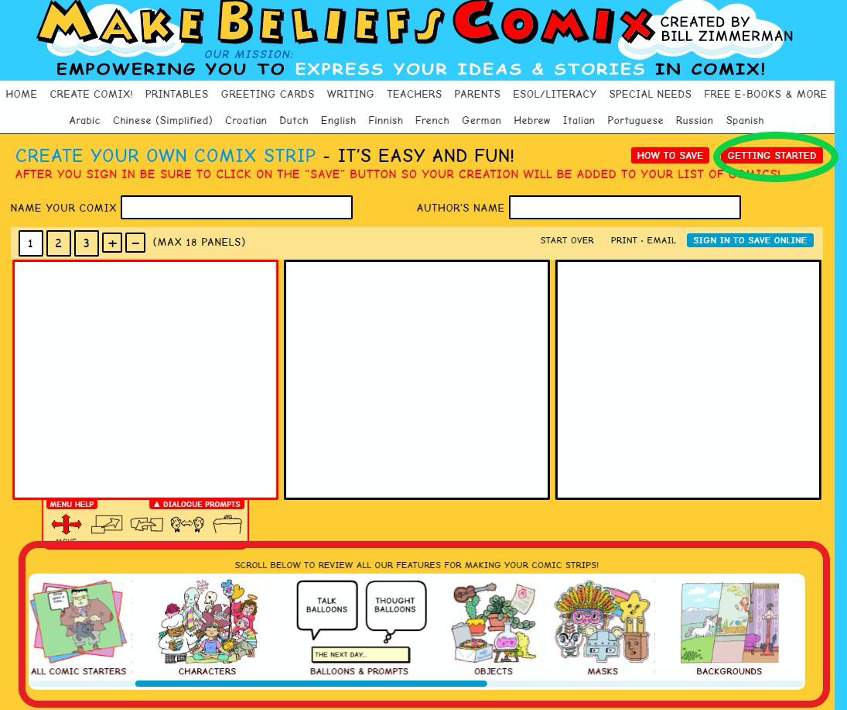
- You will now be taken to the Comix Creator. Users can also click on the “Getting Started” button (marked in green) and see a list of steps and guidelines can help users to start their comic strip creation.
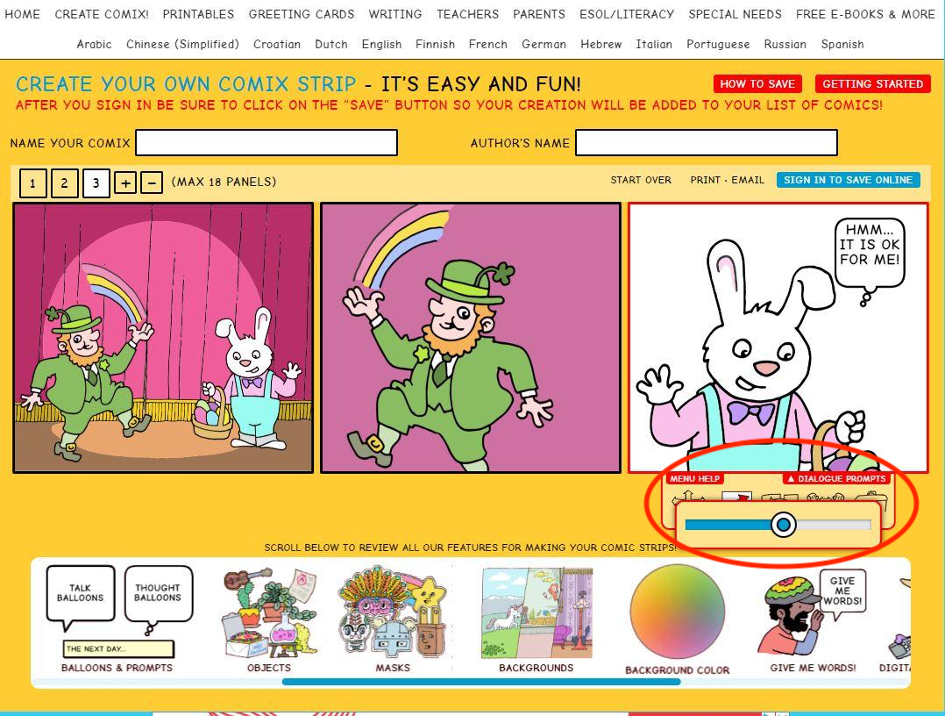
- Below the comic panels (marked in red) you will find everything that you can add to your comic, such as: Characters, objects and scenes, thought balloons, and panel prompts.
- Click these items to make them appear in the selection window, then click them again in order to add them to your comic. Note that you are able to scroll through different items by using the red arrows beneath the selection window. You are also able to change the panel colour and number of panels at the top right side of the panels (Numbers 1,2, 3, +, -), but created maximum 18 panels.
- Use the toolbar to the left (marked in green) to move, scale, delete, flip, or bring objects to the front of the comic.

As an example, the scaling option in the below strip:
- Once you are satisfied with your comic, locate the “Print/Email” button to the left of the screen and click it in order to save your work via email or paper document.
References
Articles
Schulten K., & Gonchar M., (2018, May 17). From Superheroes to Syrian Refugees: Teaching Comics and Graphic Novels with Resources From The New York Times. READING AND LITERATURE. New York Times, Retrieved from https://www.nytimes.com/2018/05/17/learning/lesson-plans/from-superheroes-to-syrian-refugees-teaching-comics-and-graphic-novels-with-resources-from-the-new-york-times.html?rref=collection%2Fsectioncollection%2Flearning&action=click&contentCollection=learning®ion=rank&module=package&version=highlights&contentPlacement=1&pgtype=sectionfront
Website
Essler S (2018, December 30). 4 free sites for creating your own comics. Retrieved from https://mashable.com/article/create-your-own-comics/?europe=true
Pappas C (2014, January 14). The 5 Best Free Cartoon Making Tools For Teachers. Retrieved from https://elearningindustry.com/the-5-best-free-cartoon-making-tools-for-teachers
Video-based sources
Dallas Thompson (2012, February 17). Make Beliefs Comix How-To.mov [Video]. YouTube. https://www.youtube.com/watch?v=71GFJpjHKkY
Introducing digital comics creation tools: BDNF and additional tools
Duration: 40 minutes Objectives: The objective of this lesson is to introduce additional digital comic ‘generators’, specifically designed for comic creation. Desirable outcomes and competences: By the end of the lesson, learners will:
|
Following the previous lesson (19) on digital comics creation tools, in this lesson we will present one additional example of the most recent (until today) tool for digital comic creation, named BDNF and also a list of other, 5 most popular freely available online tools with their basic characteristics.

BDNF
(https://bdnf.bnf.fr/)
General information and characteristics
BDNF is an independent app developed and published by the Bibliothèque nationale de France (BnF) (National Library of France) together with a desktop and a mobile device version. Recently created (January 2020), the website and the app are available for free, in both French and English.
The tool is mainly targeted at educators and students for the creation of comic strips, graphic novels or any other multimedia story mixing illustration and text, and their usage inside the classroom. There is no particular community space, or social network for the app, yet, there are a few tutorials available on Vimeo and YouTube, mainly made by educators and professors.
The platform has a FAQ page and an email for customer support. In addition, the app complies with GDPR and on the website there are the full terms of use and privacy policy according to French law.
Overall, this tool is rather easy to use and it offers a wide range of possibilities to create comics. Also, the website displays educational material and creations by graphic designers, illustrators and comic artists, which is helpful as it offers a lot of inspiration.
What it allows to do
The tool allows you to create your own strips either using the provided content on the platform or by uploading your own content. In addition, it provides educational resources to help educators use the app and implement the use of comics in their classroom.
The app provides the templates for the comic design, and users can adjust them (e.g. change the size and design of the frames) and fill them in with content. There are basic features for bubbles, shapes and characters in the app library but there is a wide range of backgrounds, objects, and various resources created for the app or from the Gallica archives. This means that users can constitute their own selection of graphical elements from the BDNF and national documents resources (Gallica database).
There is also the possibility to create your own characters and add images and external material from the personal (computers’) library. One feature that works well (especially for students’ creation of comic strips) is the ability to draw and insert those drawings to the comic as images. Furthermore, users could create lengthy pages (for screen or for printing), and potentially a whole comic book. Finally, users can easily export their projects as an image file (PNG), as a document (PDF) file or as a video file (MP4). In addition, users can even choose to apply filters, manage the quality or weight of the file.
The tool offers great possibilities to users to generate more original or longer forms of comics. For inspiration, check out the examples below, which are made on BDNF and are saved on their gallery:
- https://bdnf.bnf.fr/galerie_webtoon.html
- https://bdnf.bnf.fr/galerie_franco-belge.html
- https://bdnf.bnf.fr/galerie_bd-patrimoniale.html
Overall review and comparison
It is easy to create basic comic strips using the items existing in the Library of the project, but also adding an image from the desktop. Also editing the text is easy and the final result has a very good overall quality (e.g. image). On the other hand, adjusting things (e.g. sizes or changing the order of the frames) is not possible and therefore the app does not allow much flexibility. Also, it requires time and patience to adjust things and edit small details.
There are a handful of comic style characters that have been created for the app with different attitudes and expressions, but users cannot change elements on them. However, they can choose from a wide range of archive images from public patrimony.
The main issue is zooming in and out of the panels when navigating a strip or a page, which is not very instinctive. It’s difficult to work on one panel while keeping the view of the whole comic. Also, one function that could also be useful but is not included in the app, is to be able to copy paste the content of one panel into another or to have a grid to know exactly where you are putting the elements in a panel.
Compared to other existing tools, however, these small drawbacks do not really count, especially since BDNF is free and of high quality overall. While some tools such as StoryboardThat or Pixton only allow for one style of illustrations, BDNF allows use of pictures, illustrations from previous centuries and a few characters created for the app, which allow for a wide versatility. Hence, this tool might probably be the best comic creation tool around for now.
Additional tools
Learners can explore more online tools for comic creation even though the basic consideration from the list available below, or to any application for comic creation, is its predefined characters and themes. It is best for anyone to look at some created comic strips using each tool and see if it can actually fit their classroom needs. Also, most platforms require creating accounts.
1. Witty Comics
(http://www.wittycomics.com/)
This platform answers to the needs of those who prefer to quickly input text rather than spending time on refining the images. It has basic content and limited options, as the comics are based on ready-drawn and fairly simple scenes and predefined characters. No adjustment is possible in colours, fonts, items. It can be useful for writers that want to practice their dialogue and storytelling by letting the words speak more than the images, but not for covering the needs of the diverse students of a classroom.
2. Comic Creator
(http://www.readwritethink.org/parent-afterschool-resources/games-tools/comic-creator-a-30237.html)
This is another kind of basic comic strip generator tool which uses mainly black and white colour. Perhaps it could be used for younger learners and once printed they could fill the strips with colours (in printed paper). Yet it has overly limited content. In addition, it It works with a Flash on the website.
3. Super Action Comics Creator
https://www.culturestreet.org.uk/activities/superactioncomicmaker/)
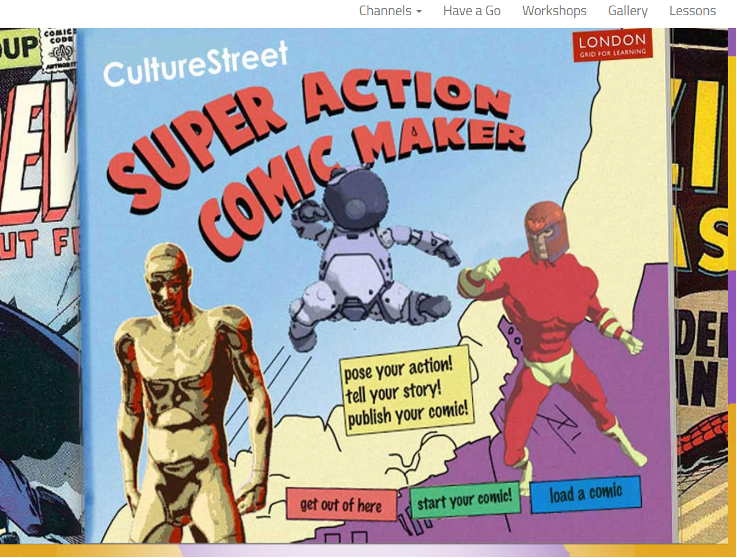
Interested in something related to space-heros?? Super Acion Comic creator is inspired by superheroes and space life. Unfortunately, the characters and background options for this tool are very limited. Also, there is a limitation on the amount of characters in the text inside the speech frames. Finally, the final result has a bad resolution once it is saved and/or downloaded and printed.
4. Write comics
(http://writecomics.com/)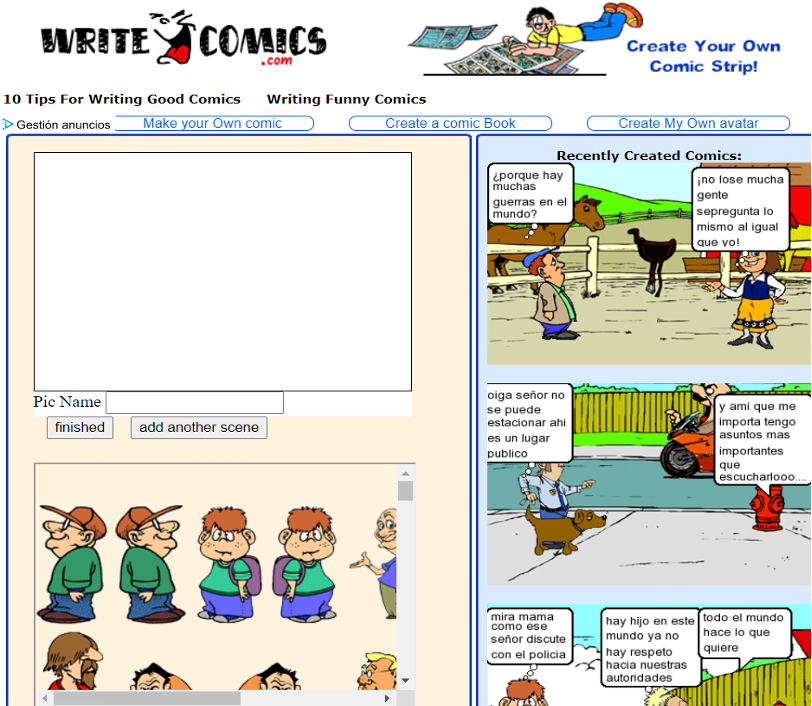
Write Comics is another simple to use application. Colourful but very minimalistic, it follows a very basic and logical way to create comic strips: first select a background, then choose characters, and then complete the story with speech bubbles. On the other hand, it is not resourceful and does not have its own online database where work can be saved or shared.
5. Strip Generator
(http://stripgenerator.com/)
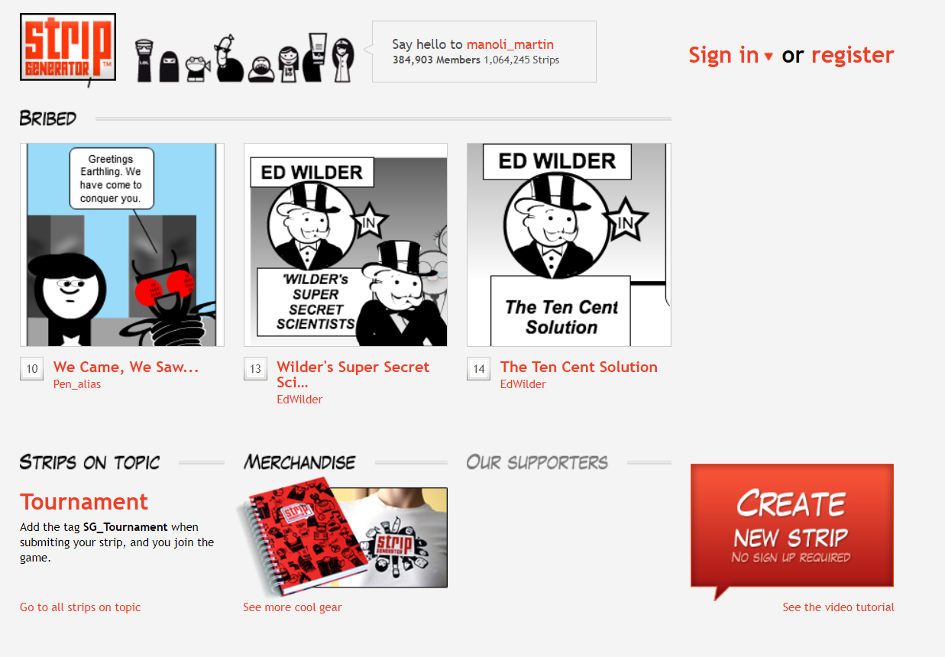
It includes stoic characters, in black and white only, and thus it does not allow users to add their personal style and adjust objects for their classroom needs (e.g. dys-friendly content). No registration required and it works with a Flash on the website. A useful feature is the adjustable frames that the tool offers. So, if users need a specific panel to be a bit wider or longer, they can just drag the wall. In addition, the tool offers a personal library option where users can tweak an image to adjust it and then save it to use again later. However, once the final result is saved and downloaded as PDF, it lacks image and text quality.
Now that you have seen the different available programs and tools for comic creation, why don’t you go ahead and try them out and tell us which one you prefer on the project Facebook page!
References
Articles
Schulten K., & Gonchar M., (2018, May 17), From Superheroes to Syrian Refugees: Teaching Comics and Graphic Novels with Resources From The New York Times. READING AND LITERATURE. New York Times, Retrieved from https://www.nytimes.com/2018/05/17/learning/lesson-plans/from-superheroes-to-syrian-refugees-teaching-comics-and-graphic-novels-with-resources-from-the-new-york-times.html?rref=collection%2Fsectioncollection%2Flearning&action=click&contentCollection=learning®ion=rank&module=package&version=highlights&contentPlacement=1&pgtype=sectionfront
Essler S (2018, December 30). 4 free sites for creating your own comics. Retrieved from https://mashable.com/article/create-your-own-comics/?europe=true
Pappas C (2014, January 14). The 5 Best Free Cartoon Making Tools For Teachers. Retrieved from https://elearningindustry.com/the-5-best-free-cartoon-making-tools-for-teachers
Website
Comedots (2011, June 28). 10 Free Online Tools to Create Comics. Retrieved from
https://blog.cometdocs.com/10-free-online-tools-to-create-comics
Media and Techniques
Bibliothèque nationale de France (2020, January 17). BDnF, la fabrique à BD [Video]. VIMEO https://vimeo.com/385435304
Yannick Guiral-Idoux (2020, April 1). Presentation-application-BDnF [Video]. VIMEO https://vimeo.com/402954437
Bibliothèque nationale de France (2020, January 27). La fabrique à BD – parcours “guidé [Video]. VIMEO : https://vimeo.com/387383287
ONLINE GRAPHISM RESOURCES TO ENRICH YOUR COMICS
Duration: 30 minutes Objectives: The objective of this lesson is to present various resources of online graphism, such as banks of images, and get learners familiar with integrating these resources for their comic strips. Desirable outcomes and competences: By the end of the lesson, learners should:
|
When you are challenged to create your comic strip, you want to provide interesting and beautiful designs for your students. Amongst the various tools you need to be equipped with, is the knowledge of online graphism resources such as free banks for images and icons, that will allow you to enrich your comics and offer an engaging and appropriate learning material to your students. Hence, this lesson will present you some free online resources to help you go further in the creation!
Using colours and creating palettes
To begin with the illustrations and colour palettes: There are many colours to choose from, and as soon as you start creating digital comics, you might find yourself spending a lot of time trying different colour combinations. In that case, having a ready-made limited colour palette could make your choices easier. It is actually very practical to have a specific colour code or create a colour palette for your project, in cases you want to create a dys-friendly comic strip and need to adjust the colours, brightness, and contrast of an image or of the background, for instance. For these purposes, there are several free online tools to help you find the colour code of images, backgrounds, drawings, etc:
- Adobe Color (https://color.adobe.com/): Colour generator for a harmony of any basic colour.
- Coolors (https://coolors.co/): Create, save and share palettes. It can be downloaded also as an application for IOS and Androïd.
- Colour Lovers (https://www.colourlovers.com/): for palettes, patterns, shapes and more.
- Color Hunt (https://colorhunt.co/): endless list of palettes.
- Paletton (http://paletton.com/): Tool to easily generate and harmonize colour palettes.
- Cohesive-colors (https://javier.xyz/cohesive-colors/): It can standardize colors and give your colour palettes a uniform feel.
- 0to255 (https://www.0to255.com/): makes it easy to lighten or darken any colour.
Text and fonts
Text font is essential in the creation of a comic strip especially considering the adaptive material for learners with SLDs (see lesson 5). Specifically, for digital comics we recommended Sans Serif fonts such as Arial and Comic Sans, or others such as Verdana, Tahoma, Open Sans, Century Gothic and Trebuchet. To explore different styles of fonts and find the best for your students, you can check the resources listed below:
- Google fonts (https://fonts.google.com/): font library, easy to download.
- Dafont (https://www.dafont.com/): font library with many choices and ideas.
- 1001freefonts (https://www.1001freefonts.com/): a big list of fonts options.
- Fontsquirrel (https://www.fontsquirrel.com/): font bank with a huge quantity of choices and ideas for web fonts.
- What the Font (https://www.myfonts.com/WhatTheFont/): It allows to find the font used in an image.
- My Fonts (https://www.myfonts.com/search/tag%3Afree/fonts/): font bank with a large quantity of matching fonts.
- Article on comics font: https://speckyboy.com/free-comic-cartoon-fonts/
Free images, vectors, icons
Below we list online free banks for images and icons where you can download and use pictures, vectors, icons, etc. under the Creative Commons license with acknowledgement of the source. Keep in mind that this will require the tool you use for comic creation, to allow the usage of external graphic content.
- Pixabay (https://pixabay.com/)
- Unsplash (https://unsplash.com/)
- The Noun Project (https://thenounproject.com/)
- Freepik (https://www.freepik.com/)
- Wikimedia Commons (https://commons.wikimedia.org/wiki/Accueil)
- Visual Hunt (https://visualhunt.com/)
- iStock (https://www.istockphoto.com/)
You can also think about images from national archives, which will provide you visuals on a wide variety of topics. For instance, the Gallica archives (https://gallica.bnf.fr/accueil/en/content/accueil-en?mode=desktop) from BNF (National Library of France) or the image archive from the British Library (https://imagesonline.bl.uk/) allow you to browse and access countless pictural resources from their archives.
Additional resources for editing
How to compress your pictures
As some pictures are very large in size, it might be impossible to upload them into your comic creation tool as such. You can thus make them smaller (compress them) and still use them in your comic. Always make sure that the images you chose are of good quality.
- Compressor.io (https://compressor.io/)
- Image Optim (https://imageoptim.com/api)
- On paint (resize option 🡪 reduce % of pixels)
How to edit your pictures
If you want to edit pictures, you can use Adobe Photoshop, but there are other free tools to use that can give you similar results.
- GIMP (https://www.gimp.org/)
- Pixlr (https://pixlr.com/)
- Pick up image (http://pickupimage.com/)
Digital drawing tools
For those who are keen to try out their drawing skills, we recommend checking the available tools below for digital painting:
- SketchBook (https://www.autodesk.com/products/sketchbook/overview)
- Krita (https://krita.org/en/features/highlights/)
- MyPaint (http://mypaint.org/downloads/)
- Clip Studio Paint (https://www.clipstudio.net/en/)
- Painter (https://www.painterartist.com/en/product/painter/)
Copyright issues
Just like in a research paper or any other publication, in digital comic creation projects, the students should give proper attribution to the sources of all content that they did not create on their own. Therefore, we should be informed and be looking for materials that have been labelled with Creative Commons licensing. Creative Commons licensing means that the creator(s) of an image, sound, document, or video has expressed permission for that work to be reused and redistributed provided that you follow the guidelines set forth by Creative Commons licenses. You can read about the differences between the Creative Commons licenses at the following URL, http://creativecommons.org/licenses
References
Articles
Cat E. (2020, September). The best free drawing software 2020: free apps for artists of all abilities. Retrieved from https://www.techradar.com/best/free-drawing-software
G2 (2017, January 24). 6 Best Free Drawing Software for Artists in 2019. Learning Hub. Retrieved from https://learn.g2.com/drawing/free-drawing-software
HOW TO USE YOUR OWN DRAWINGS
Duration: 60 minutes to 90 minutes depending on the complexity of the drawing you choose to clean Objectives: One advantage of creating a comic strip or page digitally is the possibility of using existing illustrations. These can be created by the students themselves or come from an image bank adapted to the exercise. However, digitising illustrations often requires cleaning up the image to make it usable. Desirable outcomes and competences: By the end of the lesson, learners should be able to:
|
1. Introduction: how to choose a graphic design or drawing software
There is a wide range of image processing software that allow their user to process their illustrations or pictures. Most have probably learnt about MS Paint or heard about Adobe Photoshop. While the first one has limited functions, the second is probably one of the most advanced image processing tools, but it comes with a cost, both in terms of money and in terms of learning how to use its countless functions.
Therefore, for this lesson we choose to present how to process one’s drawings with GIMP (software available at https://www.gimp.org/). It is probably one of the software that seems to fit teachers’ needs best, in the sense that it is free but still offers a wide range of tools and possibilities.
2. Introduction to GIMP
GIMP’s interface
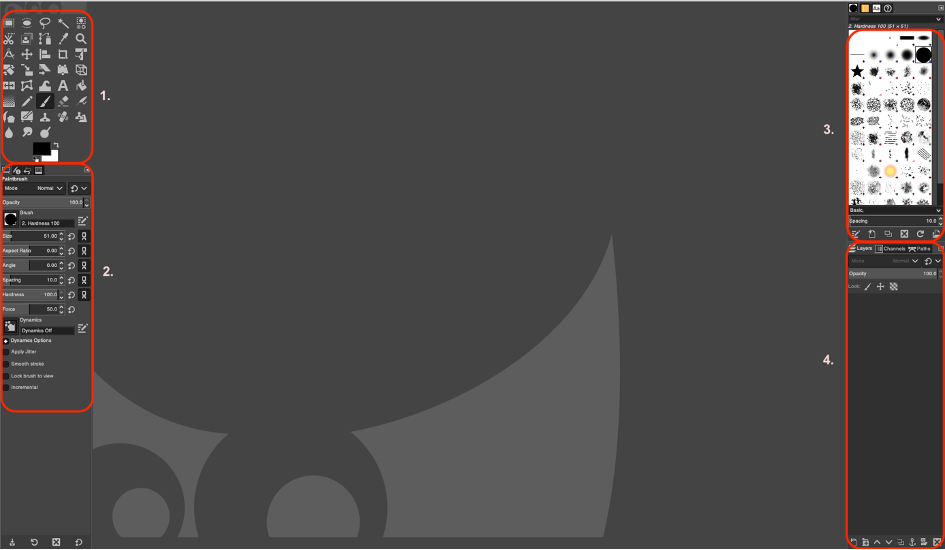
While GIMP’s interface might appear rather complex and confusing to a newcomer, this short presentation should allow you to understand its logic and make it look easier to use.
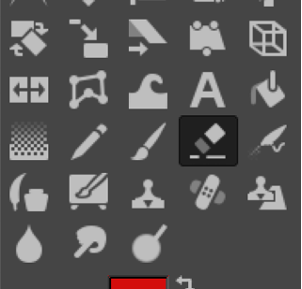
The top left part (1.) gathers all the tools of the software. Some are rather common, such as the “brush”, which allows you to draw on the image, or the “pen” which allows you to create a vector tracing or a shape. If you still fill intimidated by this variety, do not worry too much as this lesson only makes use of the most basic tools of the software.
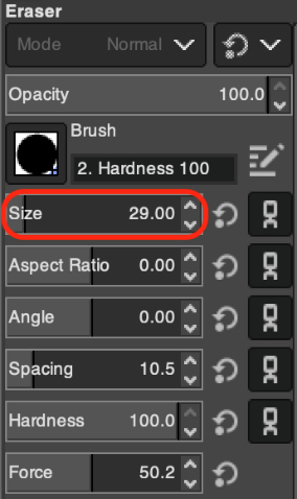
The bottom left part (2.) displays the details and setting of the tool you have selected. In the example above, we have selected the brush. Therefore, in the bottom left part, we can define the size of the brush, the opacity of its colors and other more technical parameters such as its hardness (whether the edges of the brush are crisp or blurry) or the angle of the brush (as if you were to hold the brush in your own hand) in this menu. In our lesson, we will mainly have to influence the size of the brush and keep the rest of the characteristics by default.
At the top right (3.) there is another area for setting the parameters of the selected tool: in our case the selection of the shape of the brush is displayed.
Finally, at the bottom right (4.) is the most important area for our project: the management of the image layers. The image that you have opened in the application is considered as a sheet above which you can put a transparent paper. If you add an element on this layer, it will be independent from the rest of your composition and can be rectified more easily. Moreover, you can take this layer and position it above or below your image according to your needs: it can be very useful if you need to “cut out” your image (see “Cleaning the background” below).
3. Important points to pay attention to when processing an image
For an image to be usable, the following boxes have to be ticked:
- Is the image clear enough?
- Do the contrasts make it possible to distinguish all the elements from one another?
- Do the colors look right after the image has been scanned?
- If the image is an element and not an entire panel, is there a risk that the background of the image will interfere with the other elements of your panel?
Luckily, all these concerns about your image can be easily corrected with the following instructions.
Brightness
- GIMP has a menu for changing the brightness of a layer in your image. This means that you need to make sure you are on the right layer for the changes you are about to make. In the bottom right-hand area of your GIMP application, make sure you are on the right layer (in case you have more than one).
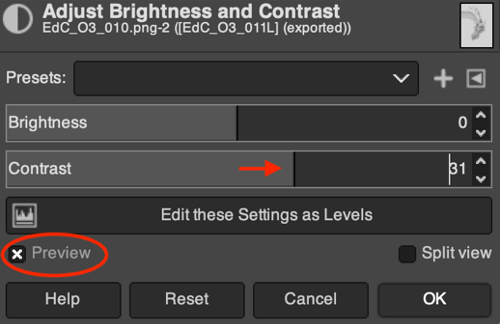
- Now go to the “colors” menu and select the “Brightness-Contrast” parameter. This takes you to the menu where you can brighten or darken your image. This parameter can be adjusted from +127 to -127 from your original level. The higher the value, the brighter the image will be. Conversely, the lower the value, the darker the image will be. By checking the “Preview” box at the bottom of this window, you will be able to see the result in real time before validating your modification.
- Do not forget to validate your modification by clicking on “Ok”. 🙂

Note: Increasing the brightness will make the black of your drawing grey. Therefore it will be necessary to adapt the contrast of your image to obtain a better result.
Contrast
As a reminder, contrast is the difference between the tones of your image. The higher the contrast, the darker the elements in your image will be close to black and the lighter the elements will be close to white. Conversely, having low contrast will make the tones of the image more neutral. It is important to keep a balance between these two extremes so that the elements of the image are identifiable (i.e. “high enough contrast”) without disturbing the clarity of reader friendliness of your image (i.e. not too much contrast).
- Similar to that for adjusting the brightness of your image, GIMP has a menu for changing the contrast of a layer in your image. This means that you need to make sure that you have selected the right layer to work on for the changes you are about to make to be relevant. In the bottom right area of your GIMP application, make sure you are on the right layer (in case you have more than one).
- Now go to the “colors” menu and select the “Brightness-Contrast” parameter. This takes you to the menu where you can brighten or darken your image. This parameter can be adjusted from +127 to -127 from your original level. The higher the value, the more contrast the image will have, conversely the lower the value, the more neutral it will be. By checking the “Preview” box at the bottom of this window, you will be able to see the result in real time before validating your modification.
- Do not forget to validate your modification by clicking on “Ok” 🙂
Cleaning the background
If you scan a drawing representing a box or a complete comic strip, you can skip this part. However, if you scan a character that you wish to integrate into a comic strip via an application, the sheet you have drawn on or the background of your scanner will appear in your image and hide your background. This is why it will be necessary to be able to crop your image.
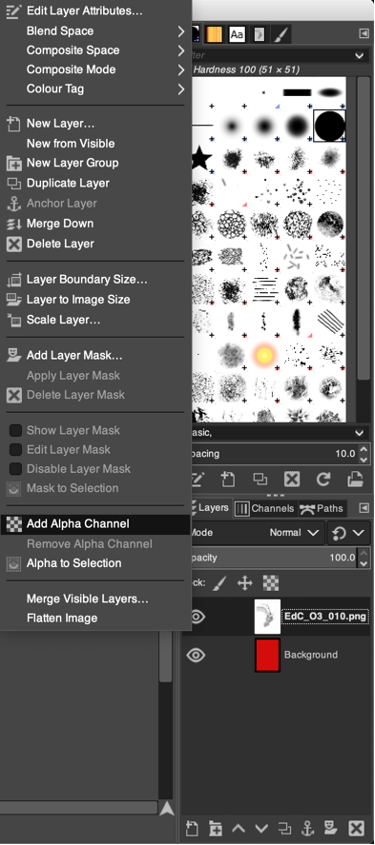
Before you dive into how to do this, you need to set up the layer of your image to make it possible to have “empty” areas (i.e. letting you see what is behind it, whether it is another layer or nothing). To do this, right-click on the relevant layer and select “Add Alpha Channel”.
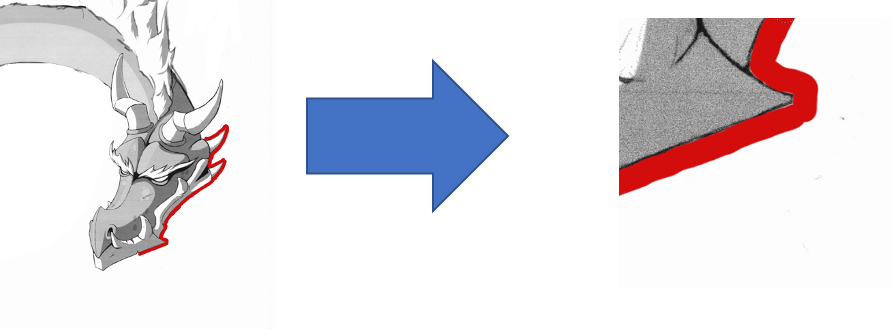
Also, we recommend that you create a layer behind your drawing that will be filled with a very bright color. This will allow you to quickly see if you have forgotten any background parts that need to be erased.
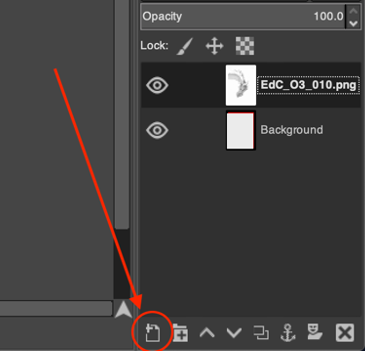
At the bottom of the layers area there is a menu: click on the leftmost icon to create a new layer. By holding the left click on your new layer, you can place it underneath the layer with your drawing.
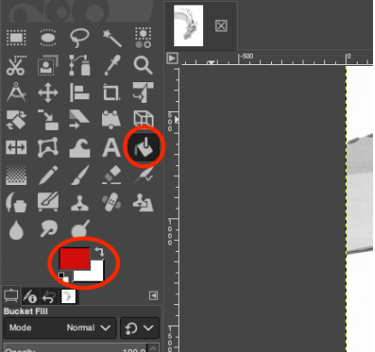
Finally select the layer you have just created in the layer zone, then return to the Tool zone to select a bright color and the Bucket Fill tool to fill the layer. Click in the middle of your image and you should see nothing! Simply because the layer of your image is always “in front” of your brightly colored layer, which means that it hides it. It will appear when you delete parts of the background of your image.
The following method has the advantage of being simple.
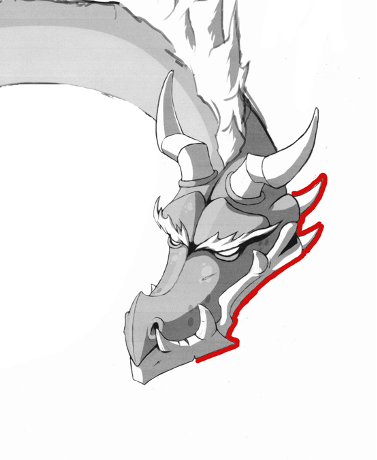
- Select the “Eraser” tool and choose the size that suits you just below.
- Then erase the background of your image.
Please note: Feel free to browse through your drawing to be more precise and not forget anything hanks to the following tools.
 Zoom in: Select the “Zoom” tool and choose the option “Direction – Zoom in”.
Zoom out: Select the “Zoom” tool and choose the option “Direction – Zoom out”.
 Move: Selects the “Move” tool.
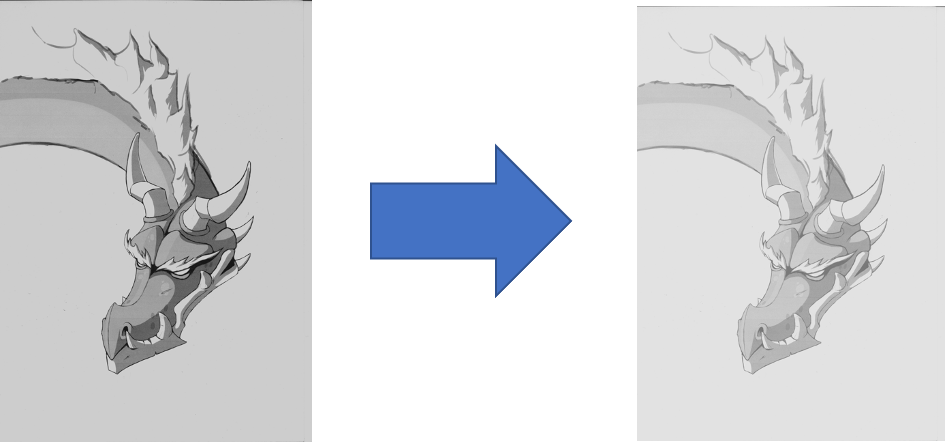
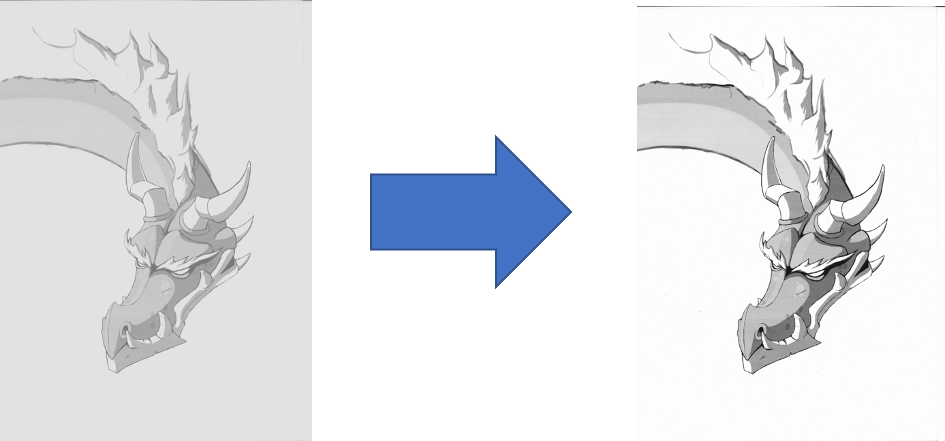
Once the brightness and contrast adjustments have been made and the background is erased, you can use the software of your choice to integrate your drawing into a panel in your comic.
Here is a quick example featuring our drawing. 🙂

These steps are summarised in the worksheet of this lesson. Try and clean one of your drawings by following it!
A SELECTION OF RESOURCES AND VIDEOS TO SUPPORT YOUR CREATIVE SIDE
Duration: 60 minutes
Objectives: To get inspiration from a variety of resources
Desirable outcomes and competences: By the end of this lesson the learners will be able to create their own comic strip by getting inspiration and motivation from a series of online resources. |
Motivational talks about creativity
Sometimes we have to look for motivation and inspiration in others and that is why we have created a collection of resources to help you get through those difficult moments when you do not know how to get started. Each talk is unique and we hope it will inspire you to create your first comic strip.
Title: Do schools kill creativity?
Link: https://www.ted.com/talks/sir_ken_robinson_do_schools_kill_creativity?language=en
Description: Sir Ken Robinson makes an entertaining and profoundly moving case for creating an education system that nurtures (rather than undermines) creativity.
Title: How to build your creative confidence:
Description: Is your school or workplace divided between the “creatives” versus the practical people? Yet surely, David Kelley suggests, creativity is not the domain of only a chosen few. Telling stories from his legendary design career and his own life, he offers ways to build the confidence to create.
Title: Why do comics belong in the classroom?
Link: https://www.youtube.com/watch?v=Oz4JqAJbxj0
Description: In this humorous talk, former teacher and graphic novelist Gene Yang shares some unexpected insights and urges educators to bring comic books into the classroom.
Title: Why we should be taking comics more seriously
Link: https://www.youtube.com/watch?v=mA1vshSuyQU
Description: Karrie Fransman creates comic strips for The Guardian, Telegraph and The Times. Her graphic novel ‘The House That Groaned’ was chosen as the graphic novel of the month by The Observer and her moving life story of Iranian immigrant Ebrahim has received critical acclaim.
Title: What makes a superhero? | Stan Lee
Link: https://www.youtube.com/watch?v=DSGf6is3U2w
Description: Stan Lee is known to millions as the man whose superheroes propelled Marvel to its preeminent position in the comic book industry. In this video he shares some of the things he has learnt over the years about comic creation.
Title: Why people believe they can’t draw – and how to prove they can
Link: https://www.youtube.com/watch?v=7TXEZ4tP06c
Description: Why is it that so many people think they can’t draw? Where did we learn to believe that? Graham Shaw will shatter this illusion – quite literally – in a very practical way. He’ll demonstrate how the simple act of drawing has the power to make a positive difference in the world
Resources on how to use comics in the classroom
Below you can find a list of websites that provide information and resources on how to use comics in the classroom. You will discover tools, activities, worksheets or videos that could be very useful when you are planning your lesson.
Topic: Teachers Guide to The Use of Comic Strips in Class: Some Helpful Tools and Resources
Link: https://www.educatorstechnology.com/2018/01/teachers-guide-to-use-of-comic-strips.html
Topic: Comics in the Classroom – Building reading comprehension and literary analysis — with help from the X-Men
Link: https://www.gse.harvard.edu/news/uk/17/12/comics-classroom
Topic: Using Graphic Novels and Comics in the Classroom. Reasons to use graphic novels and comics—popular media that hold enormous educational potential—in the classroom.
Link: https://www.edutopia.org/blog/graphic-novels-comics-andrew-miller
Topic: The Case for Using Comics in Your Classroom
Link: https://classtechtips.com/2019/09/16/comics-in-your-classroom/
Topic: Activities for using comic strips – Comic strips can be used from beginner level to advanced level for a variety of language and discussion activities.
Link: https://www.teachingenglish.org.uk/article/activities-using-comic-strips
Topic: Where to begin your story: inspiration
Link:https://www.makingcomics.com/2014/01/04/begin-story-inspiration/
Topic: Eight Ways to Use Comic Strips in the Classroom – Comic strips provide a unique and exciting way to engage learners in the world of English.
Link: https://oupeltglobalblog.com/2019/02/04/eight-ways-to-use-comic-strips-in-the-classroom/
Topic: What You Can Do With Comics – 10 Creative Activities
Link: https://busyteacher.org/7225-10-creative-activities-with-comics.html
Videos explaining advanced notions
If you are interested in learning some more advanced notions related to comic creation such as colour theory, Photoshop colouring techniques or inking in Illustrator CC; below you can find various videos and tutorials that can help you develop or improve these skills.
Advanced users:
Topic: 12 Art Hacks for Comic Book Artists!
Link: https://www.youtube.com/watch?v=KRGUV0A3NHk
Topic: 3 Color Theory Lessons in One Poster – Photoshop comic coloring tutorial
Link: https://www.youtube.com/watch?v=NfcFFsVj2Ks
Topic: A Very Different Coloring Method! Photoshop Masks Coloring Technique, Tips, & Tricks Video
Link: https://www.youtube.com/watch?v=Qxm7CSuVIMs
Topic: Quickly Inking and Coloring comics in Illustrator CC
Link:https://www.youtube.com/watch?v=3sPuXmTLBj4
Beginner/Intermediate users:
Topic: Writing/Storytelling: 10 Tips to Help You
Link: https://www.youtube.com/watch?v=xb1eMQ4K17Y
Topic: Tips, Advice & Guidelines For WRITING Comic Book Scripts
Link: https://www.youtube.com/watch?v=huJttJFmqFA
Topic: GOOD vs BAD Character Design: Tips and Tricks!
Link:https://www.youtube.com/watch?v=8wm9ti-gzLM
Topic: How To Make a Webcomic
Link: https://www.youtube.com/watch?v=DUvbxe72Dzk
GOING FURTHER: CREATING COMICS WITH YOUR STUDENTS, SHARING YOUR WORK WITH COLLEAGUES, ETC.
Duration: 60 minutes
Objectives: The objective of this lesson is to help you take comic-making a step further by introducing you to co-creation.
Desirable outcomes and competences: By the end of the lesson, learners should be able to:
|
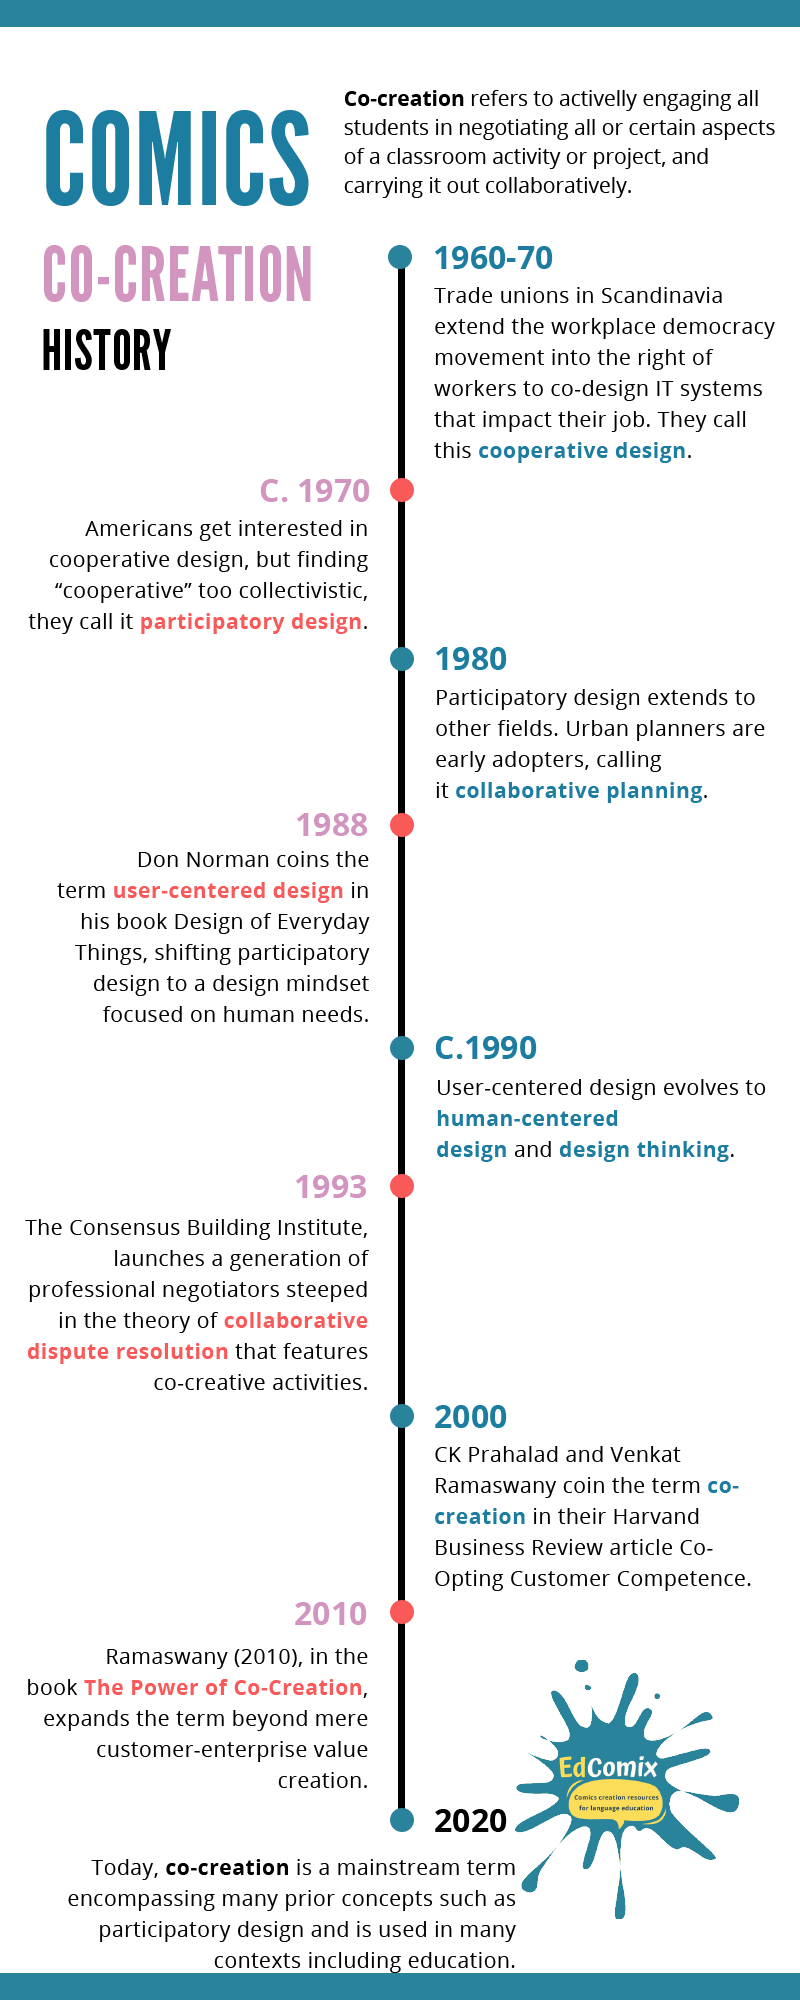
What is co-creation?
Co-creation can be defined as the collaboration of both experts and stakeholders (e.g. clients or suppliers) in order to create concepts, solutions, products and services together with experts and/or stakeholders (such as customers, suppliers etc.). A famous example of co-creation is ‘open source’ software where all kinds of experts and stakeholders collaborate to create free software tools.
Co-creation in education
In education, co-creation refers to inviting the whole-class to actively collaborate and negotiate with the teacher and each other elements of the learning process. This negotiation may include the contents of the class, the instruction methods, the assessment, and more. Co-creation can be staff, teacher, or student led.
Why co-create?
It is believed that involving the students, other teachers and other staff in creating e.g. a course (its aims, its content, its delivery, etc.) induces a shared responsibility among all of them, which, in turn, implies a greater level of student agency that will result both in better quality content learning, as well as student empowerment and higher organisational and transactional skills. The effects on staff will be similar, while the institution itself might experience a change of culture, becoming more of a community.
Limitations of co-creation
Co-creation may make staff and students accustomed to working more independently feel somewhat stressed and excluded. Furthermore, the concept itself might be perceived as a challenge to teacher expertise by teachers and students alike. As with all tools, it should be used with moderation and in combination with other approaches and methods.
How do you co-create comics?
Co-creating comics in the classroom along with students and/or other teachers may take many forms. The first two things to think about while preparing a comics co-creation activity are the following:
- What is the learning goal? Is it well-served by a comics-making co-creation activity?
- What task should the co-creation activity have? Such tasks could be:
- Recreating scenes from a novel, history, tale, etc. to practise past tense.
- Summarizing a novel, article, etc. by deciding which the key points are, so as to practice reading and writing for summarising purposes.
- Creating, continuing or revising a story with a plot to practise creative thinking, drill on certain tense, etc.
- Turning a written dialogue into “spoken dialogue” making all the necessary adjustments in the meantime to explore and practise written vs. oral language features or reported speech.
- Describing a process to practise relevant functional grammar features.
Then, the key question is: what role should each student have? Should I involve somebody else, e.g. a staff member or a teacher of another subject? The most frequently encountered roles for students in collaborative learning groups are:
- The leader, making sure that every voice is heard and that work done is focused.
- The recorder, assigned with compiling and recording minutes with the group members’ ideas, proceedings, decisions reached, etc.
- The time keeper, whose role is to encourage the group to stay on track.
- The presenter, who presents the group’s finished work to the class.
- The errand monitor who leaves the group when needed to get supplies, request help locate other resources, etc.
To these, further ad hoc roles could be added according to the project needs. Such roles could be:
- Plot writers
- Script writers
- Script and plot editors
- Font experts
- Illustrators
- Colorists
Whatever roles you might choose to assign, however, you need to:
- decide what the roles you need are,
- provide students with role descriptions, by providing clear instructions for what each role is expected to do and achieve,
- ask students to think of other relevant roles,
- allow students to choose roles, if possible
- evaluate at the end.
The same holds true for involving other teachers or staff members or outsiders: their role should be clear, while allowing them leeway to adjust their role to their personality and needs.
Finally, you should be ready to compromise if need be.
Conclusion
Now you are ready to ideate, develop and share your comics in the classroom and beyond. We hope that comics will be a useful tool in your class and that you enjoyed the course. Keep creating and if you would like, share some of your creations on our facebook page.
References
Bournemouth University. Collaboration and co-creation. Retrieved from: https://www.bournemouth.ac.uk/about/our-people/centre-fusion-learning-innovation-excellence/tel-toolkit/pedagogical-approaches-tel/collaboration-co-creation (2020, August 7th)
Edinburgh University. (2019). An introduction to student and staff co-creation of the curriculum. Retrieved from https://www.teaching-matters-blog.ed.ac.uk/an-introduction-to-student-and-staff-co-creation-of-the-curriculum/ (2020, August 7th)
Fournier, A. (2019). What is Co-Creation and Why is it so Valuable?. Retrieved from: https://www.braineet.com/blog/co-creation/ (2020, August 7th)
Fronteer. 120 graphic design terms to help cut through the jargon. Retrieved from: https://fronteer.com/what-is-co-creation/ (2020, August 8th).